English

Platon Sudoku · Sudoku Study

Unique Rectangle Type 4 · Step-by-step example

Two corners hold only {2,7}; the other two share extras. A strong link for one pair digit across the extra corners forces the other pair digit out. Remove the opposite pair digit from the two extra corners.

This course is adapted from Platon Sudoku App. Read the complete example here, then continue learning and practising in the app.

View on Google Play

Recognize the pattern

Two corners hold only {2,7}; the other two share extras. A strong link for one pair digit across the extra corners forces the other pair digit out.

How to find it

Find the two extra corners and check an exact two-place link on one pair digit in their row, column, or box.

What it allows

Remove the opposite pair digit from the two extra corners.

Avoid the mix-up

A shared line or box is not enough: the selected digit must have exactly two possible places in that region.

Step-by-step example · Strong row

This example starts from a saved intermediate position. Its candidates include earlier logical eliminations; they are not fresh automatic notes.

Blue: evidence. Green: conclusion. Crossed-out digits: eliminated candidates. R1C1 means row 1, column 1.

Step 1 · Where to look

This argument assumes the puzzle has exactly one solution. These four cells occupy two rows, two columns and two boxes. Swapping the two digits would preserve every region.
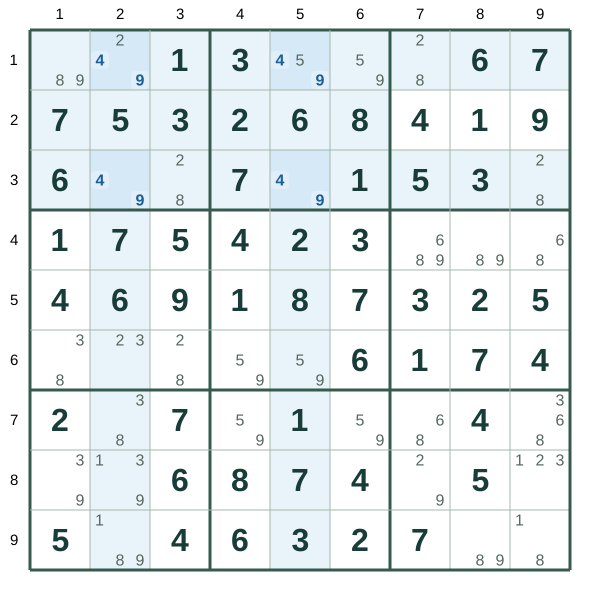
This argument assumes the puzzle has exactly one solution. These four cells occupy two rows, two columns and two boxes. Swapping the two digits would preserve every region.
Step 2 · Find the strong link

The legend identifies the exact bivalue corners and the extra-candidate corners. We will call 4 the link digit and 9 the other rectangle digit. In row 1, the link digit has only the two extra-candidate corners as positions, so exactly one of them contains it. The other rectangle digit has additional positions in the region, so the two digits are not symmetric.
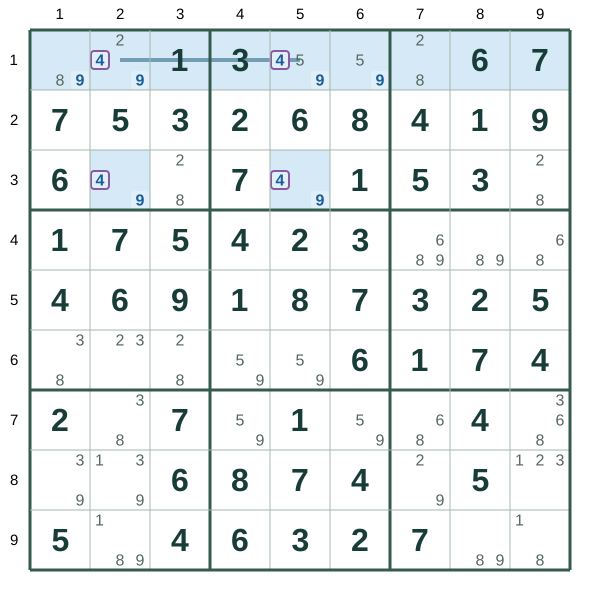
The legend identifies the exact bivalue corners and the extra-candidate corners. We will call 4 the link digit and 9 the other rectangle digit. In row 1, the link digit has only the two extra-candidate corners as positions, so exactly one of them contains it. The other rectangle digit has additional positions in the region, so the two digits are not symmetric.

G1: R3C2=4, R3C5=4

G2: R1C2=4, R1C5=4

1: Exact bivalue corners (4, 9) · 2: Extra-candidate corners

Step 3 · Case 1: assume R1C2=9

Assume the other rectangle digit at R1C2=9. The strong link forces the other extra-candidate corner R1C5 to the link digit 4. The values shown then make the rectangle swappable; exchanging 4, 9 gives a second solution. Therefore the assumption is false.
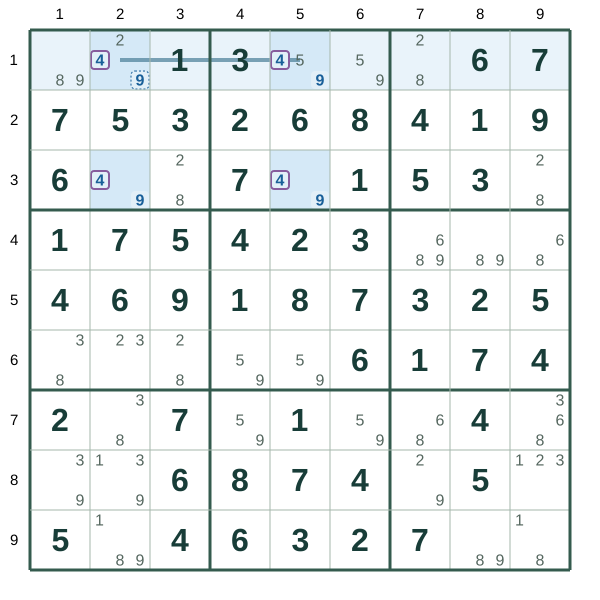
Assume the other rectangle digit at R1C2=9. The strong link forces the other extra-candidate corner R1C5 to the link digit 4. The values shown then make the rectangle swappable; exchanging 4, 9 gives a second solution. Therefore the assumption is false.

G1: R3C2=4, R3C5=4

G2: R1C2=4, R1C5=4

1: Exact bivalue corners (4, 9) · 2: Extra-candidate corners

Step 4 · Case 2: assume R1C5=9

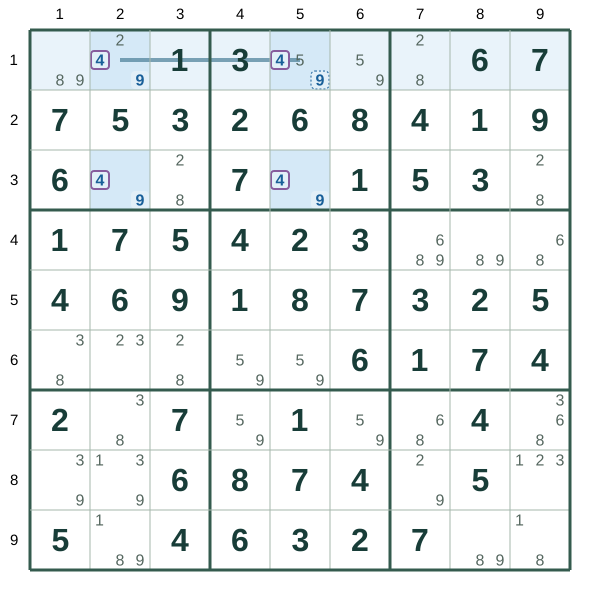
Assume the other rectangle digit at R1C5=9. The strong link forces the other extra-candidate corner R1C2 to the link digit 4. The values shown then make the rectangle swappable; exchanging 4, 9 gives a second solution. Therefore the assumption is false.

Assume the other rectangle digit at R1C5=9. The strong link forces the other extra-candidate corner R1C2 to the link digit 4. The values shown then make the rectangle swappable; exchanging 4, 9 gives a second solution. Therefore the assumption is false.

G1: R3C2=4, R3C5=4

G2: R1C2=4, R1C5=4

1: Exact bivalue corners (4, 9) · 2: Extra-candidate corners

Step 5 · Remove the other rectangle digit

The other rectangle digit at either extra-candidate corner creates the same swappable rectangle, so remove R1C2=9, R1C5=9. Keep the link digit 4: its strong link in row 1 must remain.
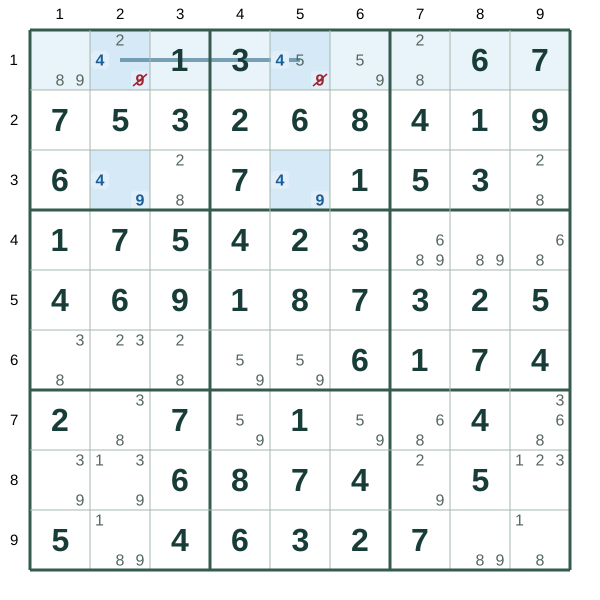
The other rectangle digit at either extra-candidate corner creates the same swappable rectangle, so remove R1C2=9, R1C5=9. Keep the link digit 4: its strong link in row 1 must remain.
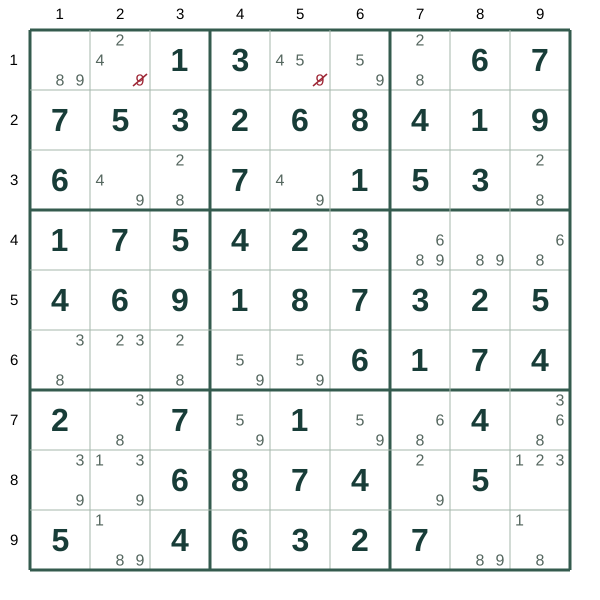

What it allows

The other rectangle digit at either extra-candidate corner creates the same swappable rectangle, so remove R1C2=9, R1C5=9. Keep the link digit 4: its strong link in row 1 must remain.

Unique Rectangle Type 4 · Remove the opposite pair digit from the two extra corners.

Step-by-step example · Strong column

This example starts from a saved intermediate position. Its candidates include earlier logical eliminations; they are not fresh automatic notes.

Blue: evidence. Green: conclusion. Crossed-out digits: eliminated candidates. R1C1 means row 1, column 1.

Step 1 · Where to look

This argument assumes the puzzle has exactly one solution. These four cells occupy two rows, two columns and two boxes. Swapping the two digits would preserve every region.
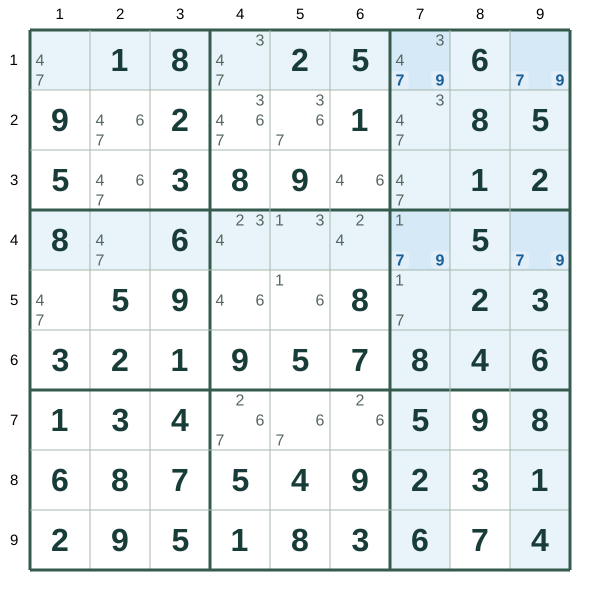
This argument assumes the puzzle has exactly one solution. These four cells occupy two rows, two columns and two boxes. Swapping the two digits would preserve every region.
Step 2 · Find the strong link

The legend identifies the exact bivalue corners and the extra-candidate corners. We will call 9 the link digit and 7 the other rectangle digit. In column 7, the link digit has only the two extra-candidate corners as positions, so exactly one of them contains it. The other rectangle digit has additional positions in the region, so the two digits are not symmetric.
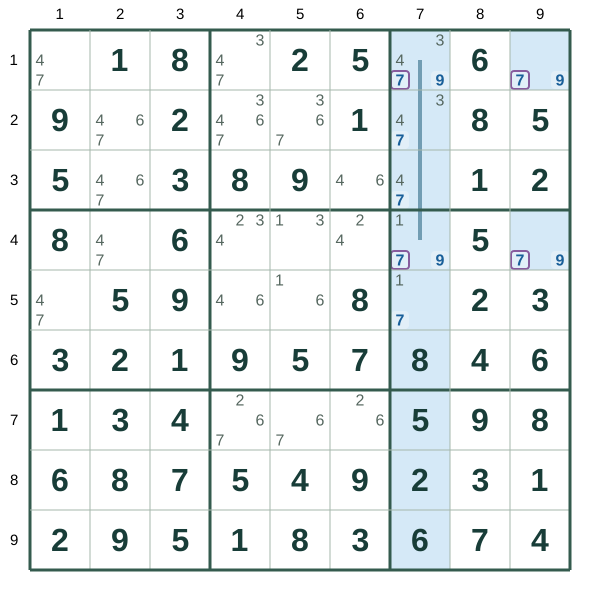
The legend identifies the exact bivalue corners and the extra-candidate corners. We will call 9 the link digit and 7 the other rectangle digit. In column 7, the link digit has only the two extra-candidate corners as positions, so exactly one of them contains it. The other rectangle digit has additional positions in the region, so the two digits are not symmetric.

G1: R1C9=7, R4C9=7

G2: R1C7=7, R4C7=7

1: Exact bivalue corners (7, 9) · 2: Extra-candidate corners

Step 3 · Case 1: assume R1C7=7

Assume the other rectangle digit at R1C7=7. The strong link forces the other extra-candidate corner R4C7 to the link digit 9. The values shown then make the rectangle swappable; exchanging 7, 9 gives a second solution. Therefore the assumption is false.
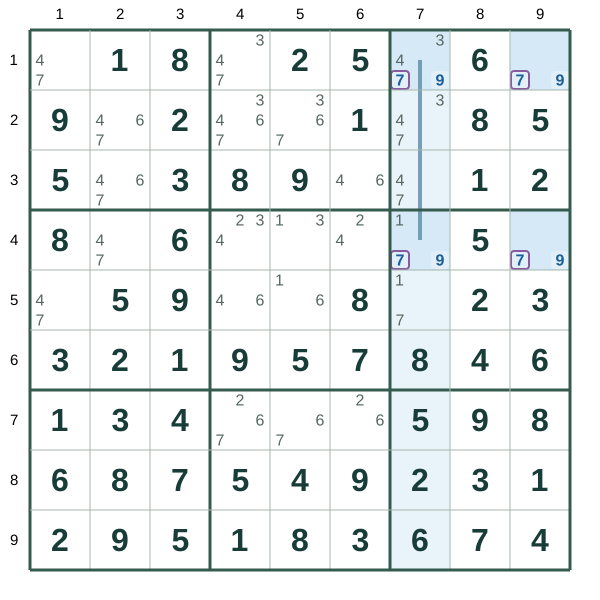
Assume the other rectangle digit at R1C7=7. The strong link forces the other extra-candidate corner R4C7 to the link digit 9. The values shown then make the rectangle swappable; exchanging 7, 9 gives a second solution. Therefore the assumption is false.
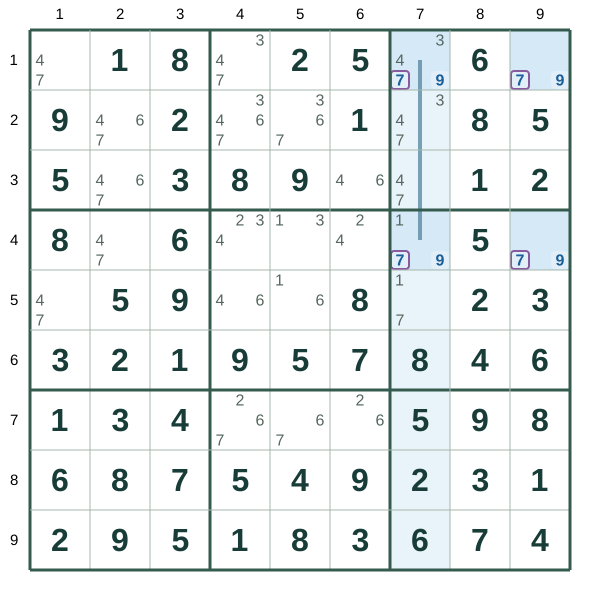

G1: R1C9=7, R4C9=7

G2: R1C7=7, R4C7=7

1: Exact bivalue corners (7, 9) · 2: Extra-candidate corners

Step 4 · Case 2: assume R4C7=7

Assume the other rectangle digit at R4C7=7. The strong link forces the other extra-candidate corner R1C7 to the link digit 9. The values shown then make the rectangle swappable; exchanging 7, 9 gives a second solution. Therefore the assumption is false.

Assume the other rectangle digit at R4C7=7. The strong link forces the other extra-candidate corner R1C7 to the link digit 9. The values shown then make the rectangle swappable; exchanging 7, 9 gives a second solution. Therefore the assumption is false.

G1: R1C9=7, R4C9=7

G2: R1C7=7, R4C7=7

1: Exact bivalue corners (7, 9) · 2: Extra-candidate corners

Step 5 · Remove the other rectangle digit

The other rectangle digit at either extra-candidate corner creates the same swappable rectangle, so remove R1C7=7, R4C7=7. Keep the link digit 9: its strong link in column 7 must remain.
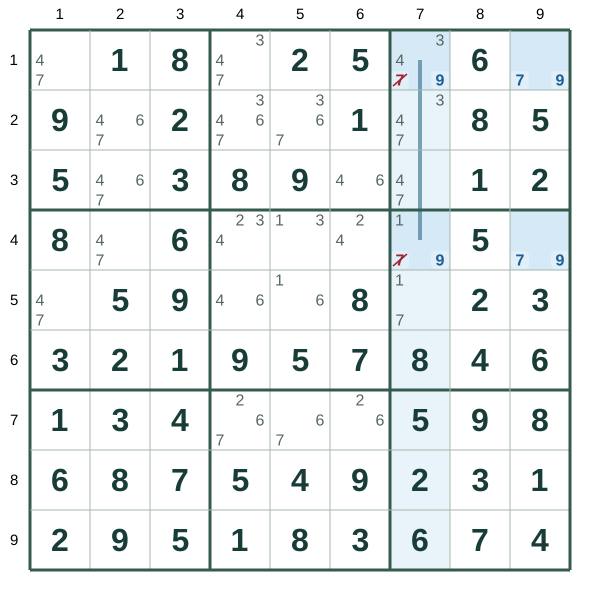
The other rectangle digit at either extra-candidate corner creates the same swappable rectangle, so remove R1C7=7, R4C7=7. Keep the link digit 9: its strong link in column 7 must remain.
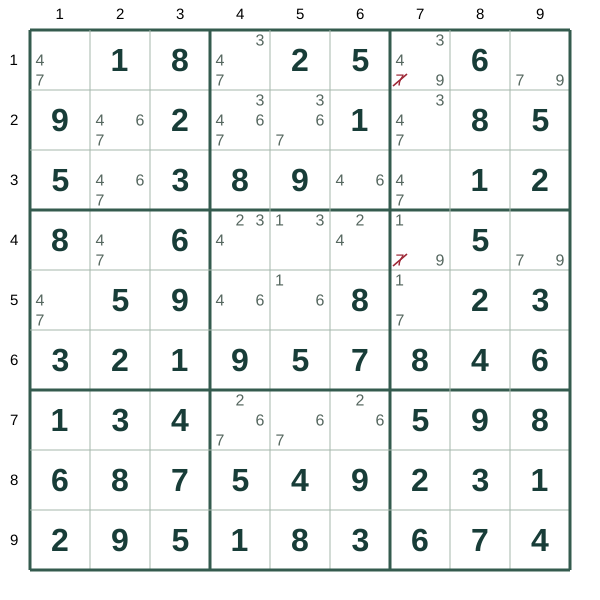

What it allows

The other rectangle digit at either extra-candidate corner creates the same swappable rectangle, so remove R1C7=7, R4C7=7. Keep the link digit 9: its strong link in column 7 must remain.

Unique Rectangle Type 4 · Remove the opposite pair digit from the two extra corners.

Step-by-step example · Box + row link

This example starts from a saved intermediate position. Its candidates include earlier logical eliminations; they are not fresh automatic notes.

Blue: evidence. Green: conclusion. Crossed-out digits: eliminated candidates. R1C1 means row 1, column 1.

Step 1 · Where to look

This argument assumes the puzzle has exactly one solution. These four cells occupy two rows, two columns and two boxes. Swapping the two digits would preserve every region.
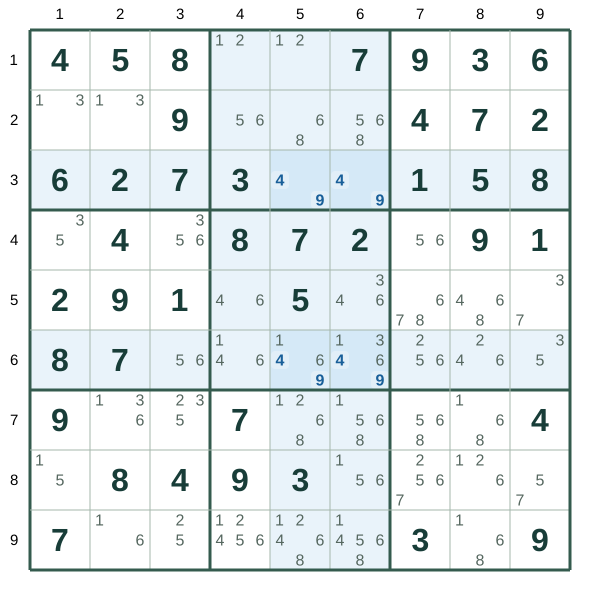
This argument assumes the puzzle has exactly one solution. These four cells occupy two rows, two columns and two boxes. Swapping the two digits would preserve every region.
Step 2 · Find the strong link

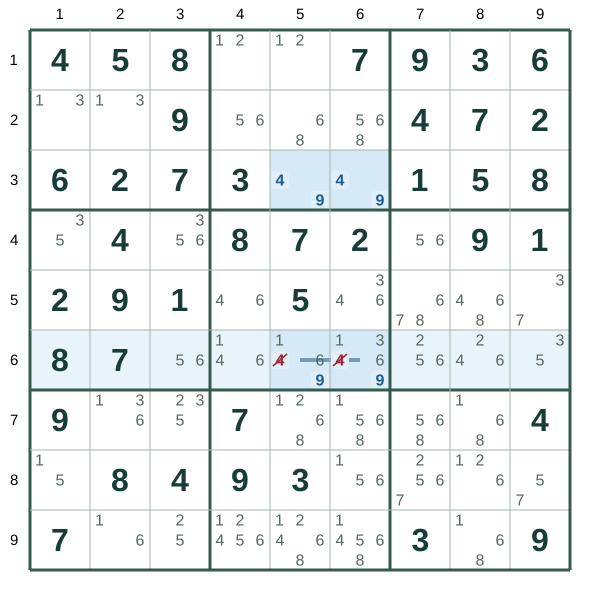
The legend identifies the exact bivalue corners and the extra-candidate corners. We will call 9 the link digit and 4 the other rectangle digit. In row 6, the link digit has only the two extra-candidate corners as positions, so exactly one of them contains it. The other rectangle digit has additional positions in the region, so the two digits are not symmetric.
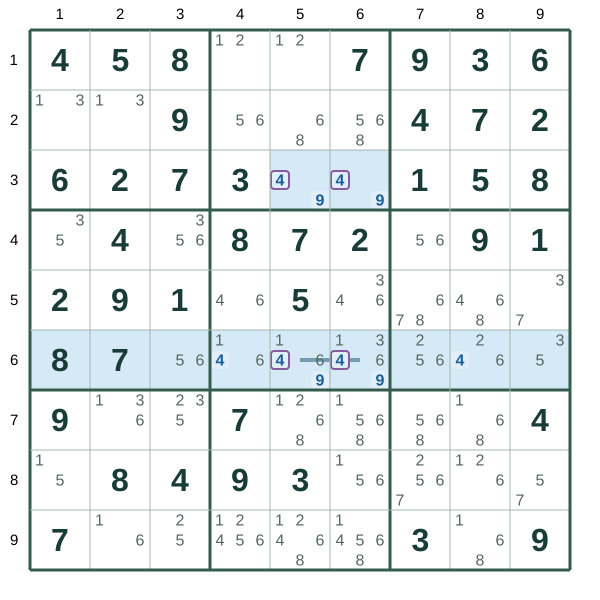
The legend identifies the exact bivalue corners and the extra-candidate corners. We will call 9 the link digit and 4 the other rectangle digit. In row 6, the link digit has only the two extra-candidate corners as positions, so exactly one of them contains it. The other rectangle digit has additional positions in the region, so the two digits are not symmetric.

G1: R3C5=4, R3C6=4

G2: R6C5=4, R6C6=4

1: Exact bivalue corners (4, 9) · 2: Extra-candidate corners

Step 3 · Case 1: assume R6C5=4

Assume the other rectangle digit at R6C5=4. The strong link forces the other extra-candidate corner R6C6 to the link digit 9. The values shown then make the rectangle swappable; exchanging 4, 9 gives a second solution. Therefore the assumption is false.
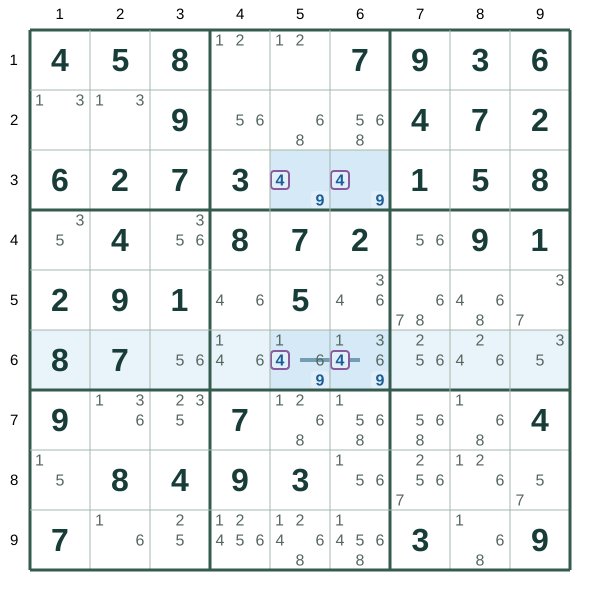
Assume the other rectangle digit at R6C5=4. The strong link forces the other extra-candidate corner R6C6 to the link digit 9. The values shown then make the rectangle swappable; exchanging 4, 9 gives a second solution. Therefore the assumption is false.
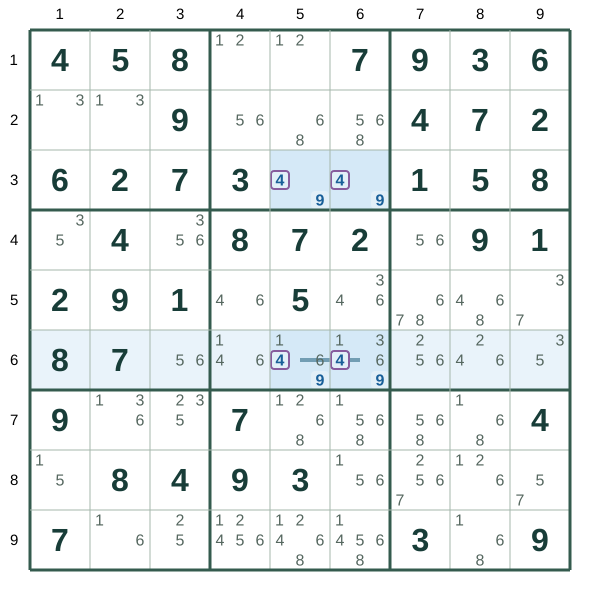

G1: R3C5=4, R3C6=4

G2: R6C5=4, R6C6=4

1: Exact bivalue corners (4, 9) · 2: Extra-candidate corners

Step 4 · Case 2: assume R6C6=4

Assume the other rectangle digit at R6C6=4. The strong link forces the other extra-candidate corner R6C5 to the link digit 9. The values shown then make the rectangle swappable; exchanging 4, 9 gives a second solution. Therefore the assumption is false.

Assume the other rectangle digit at R6C6=4. The strong link forces the other extra-candidate corner R6C5 to the link digit 9. The values shown then make the rectangle swappable; exchanging 4, 9 gives a second solution. Therefore the assumption is false.

G1: R3C5=4, R3C6=4

G2: R6C5=4, R6C6=4

1: Exact bivalue corners (4, 9) · 2: Extra-candidate corners

Step 5 · Remove the other rectangle digit

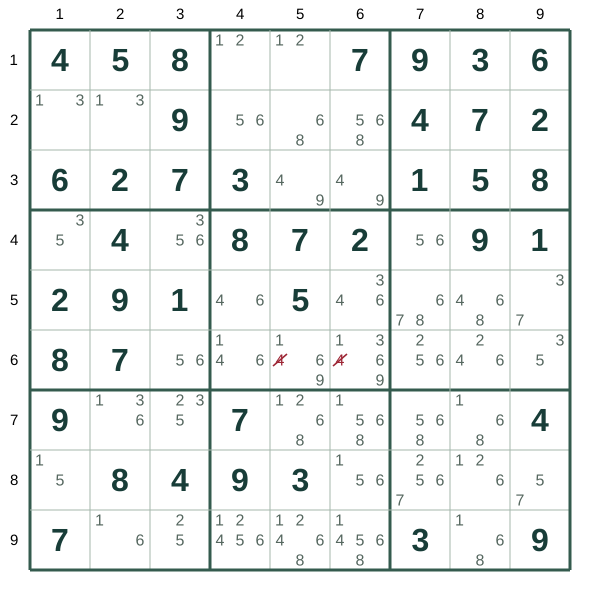
The other rectangle digit at either extra-candidate corner creates the same swappable rectangle, so remove R6C5=4, R6C6=4. Keep the link digit 9: its strong link in row 6 must remain.
The other rectangle digit at either extra-candidate corner creates the same swappable rectangle, so remove R6C5=4, R6C6=4. Keep the link digit 9: its strong link in row 6 must remain.

What it allows

The other rectangle digit at either extra-candidate corner creates the same swappable rectangle, so remove R6C5=4, R6C6=4. Keep the link digit 9: its strong link in row 6 must remain.

Unique Rectangle Type 4 · Remove the opposite pair digit from the two extra corners.

Step-by-step example · Box + column link

This example starts from a saved intermediate position. Its candidates include earlier logical eliminations; they are not fresh automatic notes.

Blue: evidence. Green: conclusion. Crossed-out digits: eliminated candidates. R1C1 means row 1, column 1.

Step 1 · Where to look

This argument assumes the puzzle has exactly one solution. These four cells occupy two rows, two columns and two boxes. Swapping the two digits would preserve every region.
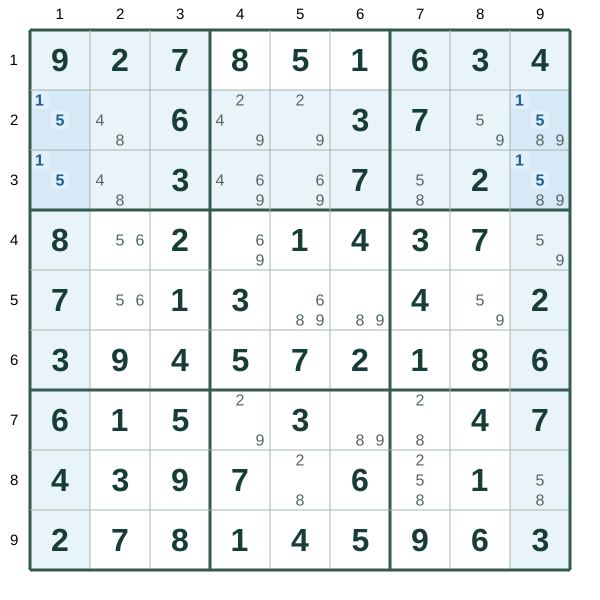
This argument assumes the puzzle has exactly one solution. These four cells occupy two rows, two columns and two boxes. Swapping the two digits would preserve every region.
Step 2 · Find the strong link

The legend identifies the exact bivalue corners and the extra-candidate corners. We will call 1 the link digit and 5 the other rectangle digit. In column 9, the link digit has only the two extra-candidate corners as positions, so exactly one of them contains it. The other rectangle digit has additional positions in the region, so the two digits are not symmetric.
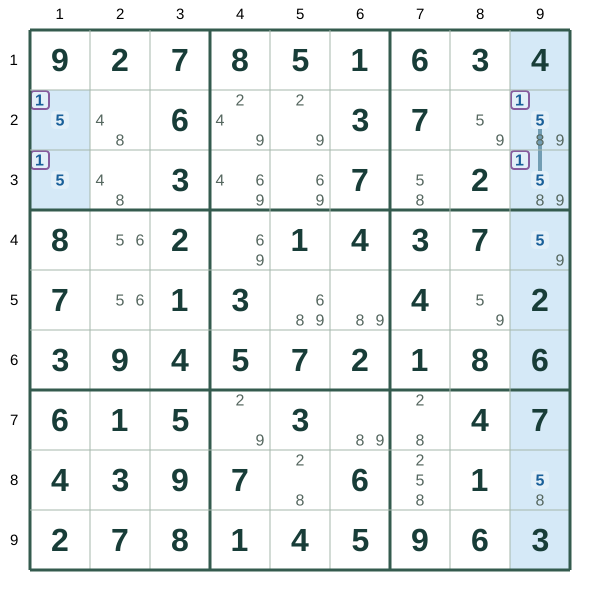
The legend identifies the exact bivalue corners and the extra-candidate corners. We will call 1 the link digit and 5 the other rectangle digit. In column 9, the link digit has only the two extra-candidate corners as positions, so exactly one of them contains it. The other rectangle digit has additional positions in the region, so the two digits are not symmetric.

G1: R2C1=1, R3C1=1

G2: R2C9=1, R3C9=1

1: Exact bivalue corners (1, 5) · 2: Extra-candidate corners

Step 3 · Case 1: assume R2C9=5

Assume the other rectangle digit at R2C9=5. The strong link forces the other extra-candidate corner R3C9 to the link digit 1. The values shown then make the rectangle swappable; exchanging 1, 5 gives a second solution. Therefore the assumption is false.
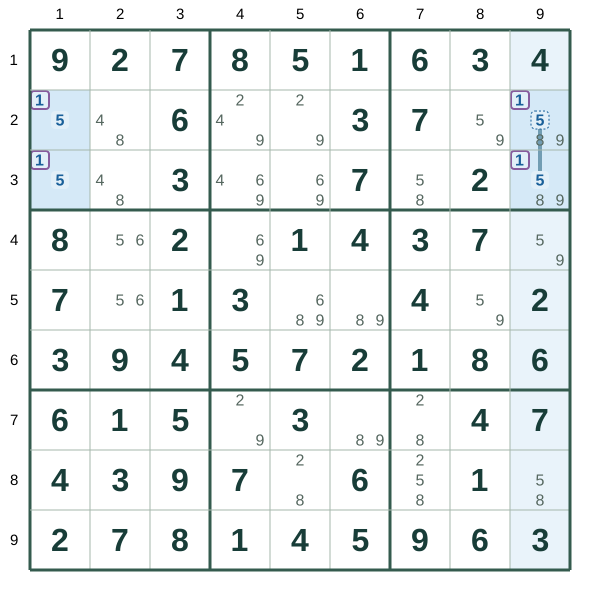
Assume the other rectangle digit at R2C9=5. The strong link forces the other extra-candidate corner R3C9 to the link digit 1. The values shown then make the rectangle swappable; exchanging 1, 5 gives a second solution. Therefore the assumption is false.
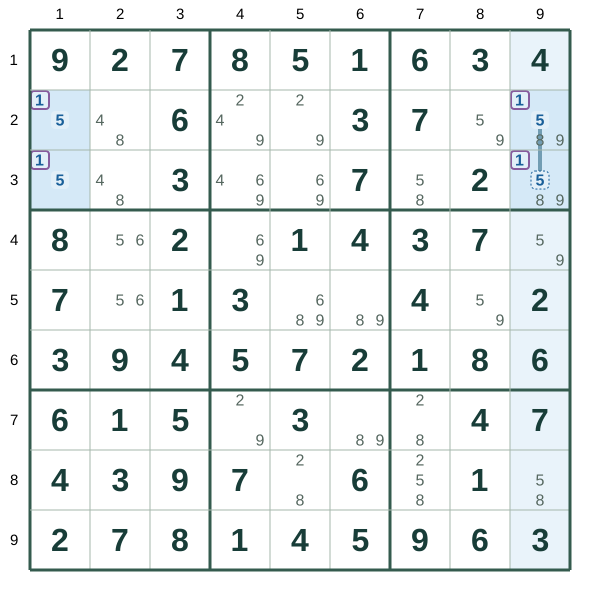

G1: R2C1=1, R3C1=1

G2: R2C9=1, R3C9=1

1: Exact bivalue corners (1, 5) · 2: Extra-candidate corners

Step 4 · Case 2: assume R3C9=5

Assume the other rectangle digit at R3C9=5. The strong link forces the other extra-candidate corner R2C9 to the link digit 1. The values shown then make the rectangle swappable; exchanging 1, 5 gives a second solution. Therefore the assumption is false.

Assume the other rectangle digit at R3C9=5. The strong link forces the other extra-candidate corner R2C9 to the link digit 1. The values shown then make the rectangle swappable; exchanging 1, 5 gives a second solution. Therefore the assumption is false.

G1: R2C1=1, R3C1=1

G2: R2C9=1, R3C9=1

1: Exact bivalue corners (1, 5) · 2: Extra-candidate corners

Step 5 · Remove the other rectangle digit

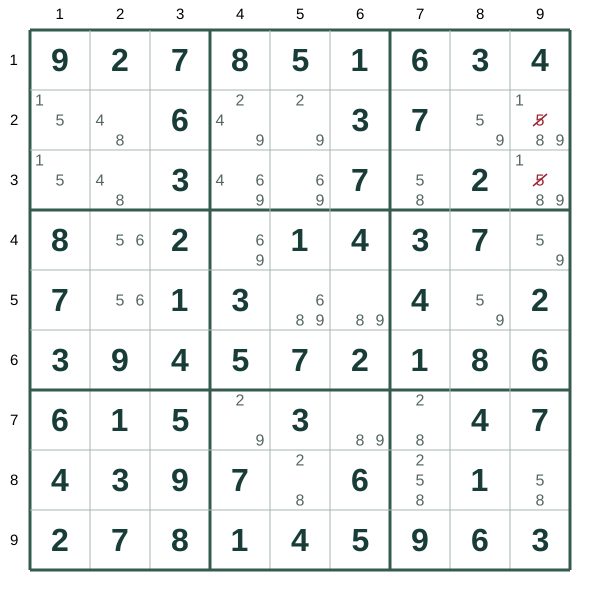
The other rectangle digit at either extra-candidate corner creates the same swappable rectangle, so remove R2C9=5, R3C9=5. Keep the link digit 1: its strong link in column 9 must remain.
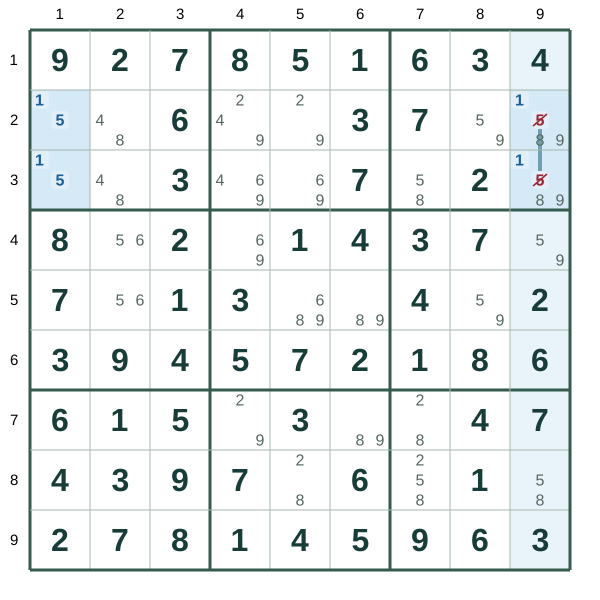
The other rectangle digit at either extra-candidate corner creates the same swappable rectangle, so remove R2C9=5, R3C9=5. Keep the link digit 1: its strong link in column 9 must remain.

What it allows

The other rectangle digit at either extra-candidate corner creates the same swappable rectangle, so remove R2C9=5, R3C9=5. Keep the link digit 1: its strong link in column 9 must remain.

Unique Rectangle Type 4 · Remove the opposite pair digit from the two extra corners.

Practice

This course is adapted from Platon Sudoku App. Read the complete example here, then continue learning and practising in the app.

View on Google Play